How-to : Bulk import jobs
- Updated on July 27th, 2024
- 314 Minute to read
- Share
-
Dark
1. Quick Overview
Purpose: The OPUS bulk jobs Importer enables administrators to efficiently import multiple jobs into OPUS, streamlining the setup process and ensuring data accuracy.
Pre-Requisites
Needed Access / Permissions: Administrator access to the OPUS platform.
Pre-setup Requirements: Ensure access to the OPUS platform and download the provided Excel import template
2. Step-by-Step Instructions
-
Download the Excel import template by clicking on the links below
- Jobs Importer: OPUSBulkJobImporterTemplate.xlsx.
- Jobs Importer with sites (This option imports jobs and sites, creating the site associated with the job if the site does not exist: OPUSBulkJobWithSiteImporterTemplate.xlsx.
-
Fill in the required information in the Excel spreadsheet, including Job Reference, Site Reference, Checklist Name, Item, Operator, Project, Start Dates etc.. Ensure all compulsory fields are completed.
- Columns with a Red Banner are considered Mandatory and must be captured
-
Check the validation indicators in column A to ensure data accuracy.
- Green indicates correct entries, while
- Red indicates incomplete or invalid entries.

- Once the spreadsheet is filled out, log in to OPUS as an administrator and navigate to the "Jobs - Checklists" section on the left menu panel
-
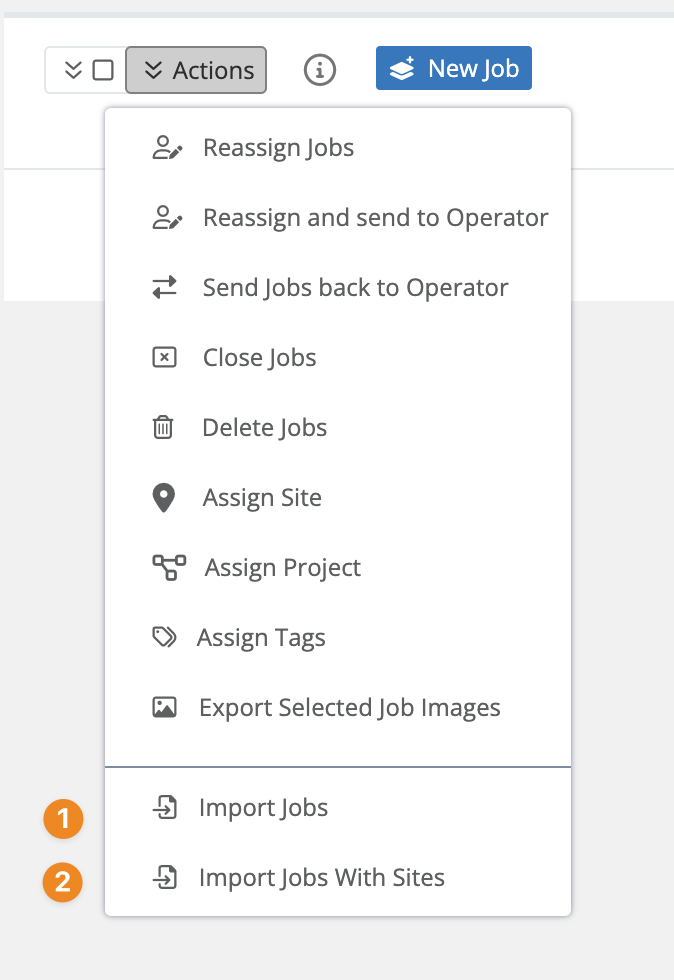
Click on Actions button then click on one of the 2 import options:
- Jobs Importer:
- Jobs Importer with Sites (This option imports jobs and sites, creating the site associated with the job if the site does not exist

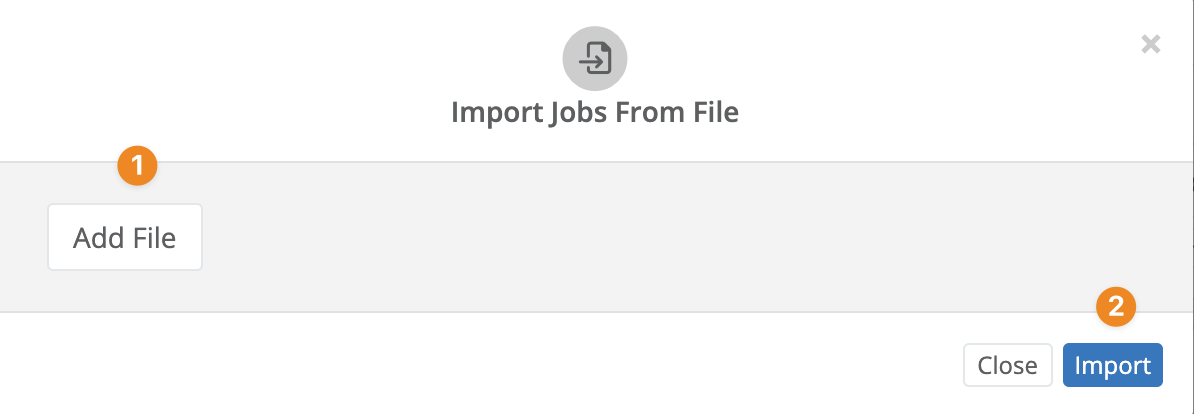
- Click on the “Add File” button to select the bulk import file, then click on the “Import” button to import the jobs into OPUS

3. Tips and Tricks
Best Practices: Double-check the data in the spreadsheet before importing to ensure accuracy.
Common Issues and Fixes:
If any entries show as invalid, review and correct the data in the spreadsheet accordingly.
Ensure all compulsory fields are completed before importing. Compulsory fields are marked by having a red banner on the column header.
Additional Resources
- refer to the OPUS documentation or contact the support team.